

Step-by-Step Home EV Charger Installation Guide 2026: Everything You Need to Know (From Planning to Power-On)
Jul 02,2026
You want convenient home charging for your EV but worry about the process turning into a mess. Many homeowners face delays, extra costs, and safety issues during installation.
A successful Level 2 home EV charger installation in 2026 starts with electrical assessment and follows clear steps for planning, permitting, and professional setup. Most standard projects take 1-4 weeks and deliver 25-60 miles of range per hour when done right.
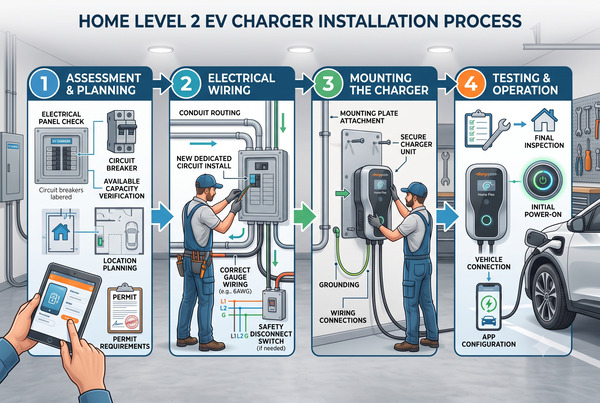
As the general manager at XIAMEN PARWATT NEW ENERGY TECHNOLOGY CO.,LTD, I have guided many customers through this exact process. I know the common pitfalls and the steps that lead to smooth results. This guide walks you through everything from initial planning to final power-on so you can install with confidence.
Why Most Homeowners Underestimate the Complexity of EV Charger Installation
You see chargers online and assume the setup is straightforward like plugging in an appliance. Reality hits when unexpected issues appear.
Homeowners often underestimate panel capacity limits, permitting requirements, wiring challenges, and scheduling delays with electricians. These factors turn a simple project into weeks of headaches and higher costs.
I have spoken with many customers who started without full preparation. One homeowner scheduled installation only to learn his panel needed major work. Let me share what makes this process more involved than it first appears.
Electrical assessment stands as the critical first step. A licensed electrician checks your panel capacity, available breaker space, and wiring condition. Older homes frequently need upgrades to handle the 30-50 amp draw of Level 2 chargers. Without this check, projects stop before they begin.
Permitting adds another layer most people overlook. Most cities and counties require permits for electrical modifications. The review process takes days or weeks depending on local rules. Skipping permits risks failed inspections, insurance problems, or even removal orders.
Electrician availability creates delays in busy areas. Many professionals book weeks or months ahead, especially during peak EV adoption seasons. Planning early avoids frustration.
Location choices affect daily use. You need enough cable reach without tripping hazards and protection from weather for outdoor setups. Poor placement leads to frustration every time you charge.
Here is a table of common complexity factors:
| Factor | Why It Matters | Potential Impact |
|---|---|---|
| Panel Capacity | Determines need for upgrades | Delays and $1,500+ added cost |
| Permitting | Required for code compliance | Weeks of waiting, fines if ignored |
| Electrician Scheduling | High demand in 2026 | Installation timeline doubles |
| Wiring Distance | Affects materials and labor | Extra $500-$1,500 for long runs |
Bullet points to consider before you start:
- Review your home’s electrical panel age and rating.
- Check local government websites for permit rules.
- Contact 2-3 electricians for availability quotes.
- Measure parking spot distance to your panel.
Our EC01 Wall Charger works well for many standard home setups once you complete the assessment.
I remember helping a fleet operator transition multiple vehicles to home charging. Early planning saved them significant time and money. Homeowners benefit from the same approach.
Location planning improves convenience greatly. Install near where you park with good cable management. Consider future needs like a second EV.
Weather protection matters for outdoor installations. Choose units with proper ratings. This prevents long-term issues.
Understanding these elements helps you approach the project realistically. You set realistic timelines and budgets from the start.
Our blog post on Level 2 vs Level 3 Charging gives useful background on why Level 2 suits most homes.
This preparation phase prevents most problems. Take it seriously for the best outcome.
Common Mistakes That Turn Simple Home EV Charger Installation Into an Expensive Headache
You try to save time or money with shortcuts. These decisions often create bigger problems later.
Common mistakes include skipping electrical assessment, choosing the wrong charger power rating, ignoring permits, and not planning for future expansion. Each one leads to extra costs, delays, or safety concerns.
I have seen these errors repeat across projects. Let me highlight them so you avoid the same issues.
Skipping the electrician assessment tops the list. Many buy a charger first then discover incompatibility. This forces returns or expensive modifications. Always evaluate first.
Selecting charger power without checking your vehicle’s onboard capability wastes money. A 22kW unit does not charge faster if your car accepts only 11kW. Match specifications carefully.
Ignoring permits creates serious risks. Work without approval may fail inspection. Insurance companies sometimes deny claims for unpermitted electrical work.
Not planning for expansion limits future options. A basic setup today might not support a second vehicle or solar integration tomorrow. Think ahead.
Here is a table of frequent mistakes and fixes:
| Mistake | Consequence | Better Approach |
|---|---|---|
| Skip Assessment | Incompatible setup | Hire electrician early |
| Wrong Power Rating | No speed benefit | Match vehicle specs |
| Ignore Permits | Legal and safety issues | Apply before work starts |
| No Future Planning | Costly future upgrades | Choose scalable solutions |
Bullet points for mistake avoidance:
- Always verify charger compatibility with your EV model.
- Budget for potential panel or wiring work upfront.
- Document all steps for warranty and insurance.
- Discuss expansion needs with your electrician.
Our EP01 Portable EV Charger gives flexibility during planning phases. You test locations before committing to a hardwired unit.
Smart chargers prevent many headaches. Features like load management and scheduling avoid peak rate charges and grid strain.
I advised one customer who installed without permits. He faced rework costs later. Learning from that, we emphasize compliance in every recommendation.
Power rating selection deserves attention. Review your daily driving distance. Most drivers need 30-50 miles of range overnight, which standard Level 2 covers well.
Future expansion includes solar readiness. Chargers that integrate with home energy systems add value over time.
These points help you sidestep expensive lessons. You complete the project smoothly on the first try.
Complete Step-by-Step Home EV Charger Installation Guide for 2026
You need a clear roadmap from start to finish.
Follow this 2026 guide: assess your home electrical system, choose the right charger, secure permits, prepare wiring, complete professional installation, and test everything thoroughly for safe operation.
At Parwatt we support customers through each phase. Here is the practical sequence that works for most homes.
Step one involves electrical assessment. Call a licensed electrician for a site visit. They perform load calculations and recommend necessary upgrades. This step usually takes 1-3 days.
Step two covers charger selection. Consider power output, smart features, and mounting type. Look for safety certifications and warranty length. Our EP02 Portable EV Charger with Display offers useful monitoring for many users.
Step three means applying for permits. Submit plans to your local building department. Include electrical diagrams from your electrician. Approval times vary from a few days to several weeks.
Step four prepares the site. Run wiring if needed, install conduit, and mount the charger bracket. Professionals handle this to meet code.
Step five is the actual installation. The electrician connects the circuit, installs the breaker, and mounts the unit. This often finishes in one day for standard jobs.
Step six includes testing and activation. Verify voltage, grounding, and communication with your vehicle. Test charging sessions at different times.
Here is a step-by-step timeline table:
| Step | Duration | Key Tasks |
|---|---|---|
| Assessment | 1-3 days | Panel check and load calc |
| Charger Selection | 1-7 days | Research and purchase |
| Permitting | 3-21 days | Submit and approve plans |
| Site Preparation | 1-3 days | Wiring and mounting |
| Installation | 1 day | Connect and secure unit |
| Testing | 1 day | Verify operation |
Bullet points for smooth execution:
- Keep all receipts and documents organized.
- Schedule steps with buffer time between them.
- Communicate regularly with your electrician.
- Test in various conditions like cold weather.
Our charge EV faster home vs public guide helps compare options during selection.
Professional installation ensures all connections meet current codes. This protects your warranty and home safety.
Location finalization happens during preparation. Choose a spot with easy access and minimal cable strain.
Testing should include multiple charge cycles. Monitor temperature and charging speed. Adjust settings as needed for optimal performance.
This full process gives reliable daily charging. Follow the order to minimize issues.
I have overseen similar installations for business clients. The same principles apply to homes with great results.
What Makes a Successful Home EV Charger Installation in 2026
You want more than just a working charger. You want a setup that performs well for years.
Success comes from smart chargers with load management, proper professional installation, good location planning, and consideration for solar integration. These elements provide convenience, efficiency, and future readiness.
Professional work stands out as a key factor. Licensed electricians ensure code compliance and proper grounding. This reduces risks and maintains warranties.
Smart features make daily use better. App control, scheduling, and energy monitoring help avoid high rates. Load management prevents overloads without expensive upgrades.
Location planning affects convenience every day. Easy access, weather protection, and cable management improve the experience greatly.
Solar integration prepares for future energy independence. Compatible chargers work with home solar systems for lower costs.
Here is a comparison table:
| Element | Basic Setup | Successful Setup |
|---|---|---|
| Installation | DIY attempt | Professional electrician |
| Charger Type | Standard unit | Smart with load management |
| Location | Any available spot | Optimized for access and protection |
| Future Ready | Current needs only | Solar and expansion capable |
Bullet points for success factors:
- Choose units with strong user reviews and support.
- Verify all certifications for your region.
- Plan cable routing to avoid hazards.
- Monitor system performance monthly after install.
Our EC01 Wall Charger includes many smart capabilities for successful long-term use.
Professional versus DIY comparison shows clear advantages for most people. Safety and compliance make the investment worthwhile.
I worked with real estate developers who installed chargers in multiple properties. Smart choices led to high tenant satisfaction.
Load management technology has improved in 2026. It balances power across home circuits effectively.
Solar ready setups gain popularity. They maximize renewable energy benefits.
These elements create installations that serve you well for many years. Focus on them for the best results.
Ready to Install Your Home EV Charger? Here’s Your Action Plan
You finished reading and feel prepared to begin.
Start with an electrical assessment this week, gather quotes from electricians, research chargers, and set a realistic timeline. Action now brings convenient home charging soon.
From my role at Parwatt, I encourage immediate next steps.
Contact your local utility first. They often provide assessment help or incentive details.
Schedule the electrician visit. Prepare questions about your specific home.
Research and compare 2-3 charger models. Consider features that match your driving habits.
Create a project timeline with buffer days. Share it with everyone involved.
Here is an action plan table:
| Action | Target Week | Responsible Party |
|---|---|---|
| Utility Contact | Week 1 | You |
| Electrician Assessment | Week 1-2 | Licensed Pro |
| Charger Research | Week 1 | You |
| Permit Application | Week 2 | Electrician helps |
| Installation | Week 3-4 | Professional team |
| Final Testing | Week 4 | You and electrician |
Bullet points for quick progress:
- Bookmark useful resources like our FAQ page.
- Prepare a folder for all project documents.
- Set reminders for follow-up calls.
- Join local EV owner groups for advice.
Our portable chargers let you begin charging while planning permanent installation.
I have helped many customers launch their projects successfully. Consistent follow-through leads to great outcomes.
Review your daily schedule. Find the best time for installation work.
This plan turns ideas into reality. Take the first step today.
Conclusion
Installing a Level 2 home EV charger in 2026 is more accessible than ever, but proper planning is essential to avoid costly surprises. From electrical assessment and permitting to choosing the right charger and professional installation, each step affects your final cost, safety, and long-term satisfaction. A well-planned installation not only provides convenient daily charging but also future-proofs your home for increasing EV demands. Whether you do it yourself or hire professionals, understanding the full process ensures you get reliable, safe, and efficient charging. Take the first step today — evaluate your home’s electrical system and start planning your EV charger installation.
FAQ
How long does it take to install a home EV charger?
Most standard projects take 1-4 weeks including assessment, permits, and work.
Do I need a professional electrician for Level 2 charger installation?
Yes, professionals ensure safety, code compliance, and warranty validity for most setups.
What permits are required for home EV charger installation?
Electrical permits from local building departments are usually mandatory.
Can I install a Level 2 charger myself?
Basic setups are possible but professionals are strongly recommended due to risks.
How much does a typical home EV charger installation cost in 2026?
Expect $800 to $3,500 depending on upgrades and location.
Should I install a charger now or wait for better technology?
Install now for immediate benefits. Technology improvements continue but current options work very well.
Explore more resources on our site including the solutions page and product categories for the latest options.

--- END ---
Related Posts
Business Ideas

Business Ideas

Maximum PSI vs. Airflow: What Really Determines Tire Inflator Performance?
September 08, 2026
Industry News

Sourcing Portable Tire Inflators from China: A 2026 B2B Buyer’s Guide
September 07, 2026
Business Ideas

Corded vs. Cordless Car Vacuum Cleaners: A Wholesale Buyer’s Guide
September 04, 2026
Business Ideas

